Showing posts with label Random Stamping. Show all posts

Tuesday, February 1, 2022

February SOTM - Here's the Story Blog Hop

Welcome to our Stamp of the Month Blog Hop! I hope you will hop along with us and check out all of the amazing artwork created using the February SOTM, called Here's the Story it is a set of  26 stamps.

There are 2 different versions of this stamp set. 
If you spell Favourite with a U in it then you want S2202E.
If you don't then you want S2202.

This set is only available for the month of February.  It is $25.75 or you can get it for $6.75 with a $60 order.  Or for free with a $60 order if you are a VIP customer.)


If you arrived here from Darlys Recker, then you are in the right spot.  The blog hop is a big circle, so you can start here and work your way around.  If you get lost along the way, Melinda's Blog has a complete list of all the participating consultants.  

 This month we have around 12 Close To My Heart Makers/Consultants sharing their creations using this month's SOTM and other great CTMH products on their blogs. 

Today, I have a couple of different projects to share with you. This SOTM is very suited to creating scrapbook layouts but you can also create cards with it as well.  So, I have 3 cards and a single page layout to share with you.


I used the  Sweet as Honey paper, Botanical Embossing Folder, Onyx Liquid Pearls, the cardstock colours are Mulberry, Sage & Black, and the ink pads used where Mulberry, Sage & Black.  I also used some gold foil paper and gold shimmer trim.


For the layout, I used similar elements.  Paper colours are Harbour, Black, White, Linen and Mink.  Ink pads Harbour & Black.  I added doodles with the Navy LePen and black journaling pens.

Here are some close-ups of the details.  

I love to create my own pattern paper.  Here are 3 that I did. 
I love the line of words and how that frame makes great pattern paper.

I sponged Harbour ink on the background paper.  I added some dovetailed Black Shimmer trim under the title element which is popped up on thin foam tape.

I added the year under the photo using the number stamps in this stamp set.  
As you can see this photo is from almost 30 years ago.

If feels so nice to document this story.  I have been trying to use some of my old photos that I have printed.

I hope you enjoyed this layout & the cards and I would love to hear what you think of them.

Now "Hop" on over to becca-expressions to see what she has created! Be sure to visit all the Consultants at their Blogs to get some great crafting ideas and other fun ideas! Remember, the February SOTM is only available until the 28th!  Contact your CTMH Consultant (or click here) to see how you can get this stamp set at a discount!  If you are in Canada and don't have a consultant I would be happy to help you.

Blessings,  Kim 

Saturday, January 8, 2022

Smitten Blog Hop

 Welcome to our Smitten Blog Hop! 

Have you tried creating with the Smitten special?  If you haven't I hope you will be inspired to try creating with it after you check out all of the amazing art we have created for this blog hop.


  If you arrived here from Melinda Everitt, then you are in the right spot.  The blog hop is a big circle, so you can start here and work your way around.  If you get lost along the way, HERE is a complete list of all the participating consultants.  


 There are about 7 Close To My Heart Makers/Consultants sharing their Smitten creations during this blog hop.


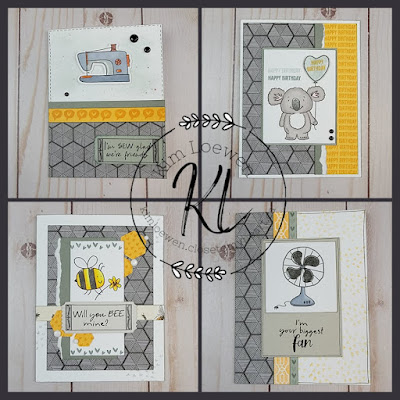
I decided to play around with the Smitten stamp & thin cut set and combine it with the Sweet as Honey cardmaking workshop kit.  I wanted to show that you can take a workshop kit designs & switch it up by changing the stamp set.  I designed these for my VIP customers.

Here is my remake of card #1 from the kit.  


Card #2


Card #3


Card #4


For these cards I used the same supplies as the kit called for plus some clear & paprika shimmer brush and some Tri-Blend markers for colouring (Orange, Citrus, Ice Grey, Brown Grey and Pale Pink.)  The supplies called for are Black ink pad (I used both Archival & Intense Black), Sundance ink, Rosemary ink, Sponge daubers, thin 3-D foam tape and adhesive.

I hope you enjoyed these cards and I would love to hear what you think of them.  Which one is your favourite?  This collection does not need to be Love or Valentine themed and I hope I showed you that.

Now "Hop" on over to see what Scrappin Katy has created! Be sure to visit all the Consultants at their Blogs to get some great crafting ideas and other fun ideas!  Contact your CTMH Consultant (or click here) to see how you can purchase these products!  If you are in Canada and don't have a consultant I would be happy to help you.

Blessings,  Kim

Thursday, April 15, 2021

"Dazzling Dimension" CTMH Technique Blog Hop


 Welcome to our Technique Blog Hop!  
This month there are about 12 of us highlighting the “Dazzling Dimension” Techniques!  This blog hop is a great big circle so you can start wherever you want and continue through to see all the fabulous artwork incorporating this technique.  

If you get lost along the way Melissa has a complete list of the hop participants.

If you are coming from Katy's Blog, you are on the right track! 

Today, is the 3rd day that the temperature has been above 0C and it is melting like crazy outside.  Spring has finally started to happen up here in the Northwest Territories of  Canada. 

I decided I wanted to create a layout using Pattern 1 of the new Vol. 5 Make it from Your Heart how do book.  This pattern has paper weaving which is a fun way to add dimension.  I went into my old photos to find a photo to use and found this fantastic photo of me from 20 years ago.  I can remember that spring day and some of the emotions I was feeling.  Remember, it is never too late to tell your story.


I tried to create dimension in a variety of ways.  I love the paper weaving and the off set photo mats.

I love the dimension water colouring the flowers with the ink pads, adding clear shimmer brush and Diamond stickles adds to them.  For added dimension I popped them up with foam tape.

Doing the part of the title popped up on foam tape with the edges inked is another way to add dimension to a project.  I also blended some Peacock Feathers distress oxide ink behind the title.

Using an embossing folder, inking the edges of photo mats, layering photo mats and using foam tape are other ways to add dimension.

Stamping along the outside of a photo mat.


Supplies Used: 
- Cherry Blossoms stamp set
- Peacock Cardstock
- Smoothie Cardstock
Peach Cardstock
- Almond Cardstock
Smoothie ink
- Peacock ink
- Espresso ink
Diamond Stickles
The Stamptacular sale is happening until the end of April.


Thanks for stopping by! Please continue onto Maz's Blog where you will find some additional artwork highlighting this technique!  Be sure to leave a comment and let me know what you thought of my variation and happy hopping!  If are in Canada and don't have a Maker, I would love to help you.  

Blessings, Kim

Thursday, April 1, 2021

April SOTM Blog Hop - Scandinavian Folk Art Greetings


Welcome to our Stamp of the Month Blog Hop! I hope you will hop along with us and check out all of the amazing artwork created using the April SOTM, called Scandinavian Folk Art Greetings it is a set of 17 stamps.

 If you arrived here from Gina's Blog, then you are in the right spot.  The blog hop is a big circle, so you can start here and work your way around.  If you get lost along the way, Melinda's Blog has a complete list of all the participating consultants.  

 This month we have around 12 Close To My Heart Makers/Consultants sharing their creations using this month's SOTM and other great CTMH products on their blogs. 

So, I wasn't a huge fan of this set when I got it and I challenged myself to create art with it that would make me and people like me fall  in love with it.  I think this is the most art I have ever created for a SOTM blog hop and I have lots more ideas.  My original thought was to do some masking of the flowers growing out of the tops of everything but I didn't end up doing that.  I am very happy with the 4 cards I created using this set and the variety of ways I used it.  


So, the first 2 cards are based off Pattern 17 of  Vol. 4 of the Make it From your Heart book and were inspired by a card Shannon Smoldt created using the March SOTM.  When I saw her card it was like a light bulb went off in my head and I was like here is a way I can use this set that I like.  These were the first things I created using this set and I plan to create some layouts using the boot image this way to create base pages for some Cowboy photos of my son.  

The base layer was sanded and then stamped on and again sanded.  I used Fern & Sapphire cardstock & ink for them as well as Black Archival ink and the Floral Lace embossing folder.  There is lots of sanding on these cards.  LOL.  


Then the next 2 cards I combined the Kitchen Gnomes set with the SOTM and used 1/2" strips of paper.  This a great way to use up paper scraps and I learned how to create this background from Sara Baktin.  I did a video yesterday showing how to create this background. You can view it HERE.

I used a few of the SOTM stamps to do tone-on-tone stamping on the Sage & Peach strips.  The colouring was done with the Tri-Blend markers and shimmer brushes.  I added some Liquid Glass, Liquid Pearls and Stickles to add some dimension & interest.


Products Used:
- Kitchen Gnomes stamp & thin cuts set
- Sapphire Cardstock
- Fern Cardstock
- Sage Cardstock
- Desert Rose Cardstock
- Peach Cardstock
- Pewter Cardstock
- Sapphire ink
- Fern ink
- Peach ink
- Sage ink
- Diamond Stickles
- Silver Stickles
- Blue Belle shimmer brush
- Red shimmer brush
- Bisque Liquid Pearls
- Fair Skin marker
- Dark Red marker
- True Black marker
- Ice Grey marker
- Earth Brown marker
- sanding block

The Stamptacular Sale is also happening this month and you can save up to 50% on stamp & thin cut sets and save up to 35% on stamp sets.

I hope you enjoyed these cards and I would love to hear what you think of them.

Now "Hop" on over to Miss Carrie's Blog to see what she has created! Be sure to visit all the Consultants at their Blogs to get some great crafting ideas and other fun ideas! Remember, the April SOTM is only available until the 30th!  Contact your CTMH Consultant (or click here) to see how you can get this stamp set at a discount!  If you are in Canada and don't have a consultant I would be happy to help you.

Blessings,  Kim
Saturday, March 20, 2021

Canadian Blog Hop - March/April Catalog

  We are so glad to have you join us today for the Canadian Blog Hop. Today we are featuring the new products that you can find in the the March/April Catalog. You can view this catalog here.

This is a circular hop so you can make your way around. You should have arrived here from Brandi's Blog. If you get lost along the way or would like to start at the beginning you can find the list on Michelle's Blog.

Here is the simple single page layout I created.


To create this layout I used the Daisy Meadows paper package, Peacock, Almond, Glacier & White Daisy cardstock.  I stamped with Almond, Peacock, Intense Black & Archival Black ink pads.  I used the largest Stitched Bracket thin cut for the title & journaling spot.  I simply cut it in half.  The stamp sets I used were Cherry Blossoms & the Daisy Meadows stamp & thin cut set.  I coloured with the Coral & Citrus Tri-Blend markers.

This is a close-up of the tone on tone stamping using the Cherry Blossoms stamp set.  The title is from this set too.  

Next up on the Blog Hop is Joanne's Blog, so head over and check out what she has created.
Thanks for joining us to see what we created. I would love to hear what you thought of this layout. I hope you can join us again on May 20th for the next Canadian Blog Hop.
If you don't have a Maker, I would be happy to help you with all your scrappy needs.
Blessings, Kim


Saturday, November 16, 2019

Holly Jolly Scrapbook Workshop

Good Evening!

I have been working on a Holly Jolly Scrapbooking Workshop over the past few weeks.  I have incorporated some Cricut images as well as used the Holly Jolly - Scrapbooking Stamp & Thin Cuts set.  This is the same stamp & thin cuts set used for the Days of December Album ( I am teaching an online class Nov 27th at 7 pm and would love to have you join me.)  and I used it on a card I made on yesterdays blog post as well.

This workshop contains 3 - 2 page layouts.  You can get the directions for the workshop from me when you spend $30 with me before shipping & tax. Including a Design Space cutting file.  Just send me a message letting me know that you would like the directions for this workshop.  If you are interested in a pre-cut kit send me a message or comment and we can figure that out.

Layout #1

Layout #1

Layout #2

Layout #2


Layout #3

Layout #3


Holly Jolly - Scrapbooking Stamp & Thin Cut Set

A card I made using a whole bunch of the Holly Jolly collection as featured on yesterdays blog post.
Supplies Needed for this workshop:

X5965 - Ruby Cardstock ( 3 sheets )
X5959 - New England Ivy Cardstock ( 3 sheets )
X6038 - Candy Apple Cardstock ( 1 sheet )
X5960 - Fern Cardstock ( 1 sheet )
E1041 - Brushed Letters stamp set
Z2870 - Ruby ink pad
Corner Rounder
Z2045 - Non-stick mat
Paint brush
die cutting machine
Paper Trimmer
Y1005 - 1" x 6.5" block
Y1000 - 1" x 1" block
Y1003 - 2" x 2" block
ruler
Cricut images used from: CTMH Flower Market, CTMH Seasons of Joy, CTMH Artistry, CTMH Art Philosophy, CTMH Artbooking, Merry & Bright, and Basic Shapes   All of these can be acessed with Cricut Access or if you purchase the cartridges.  Please use my affiliate link to purchase Cricut items (Including Cricut Access) as you are supporting a small business by doing so, and  I earn a small commission at no extra cost to you.

If you have any questions please let me know.  
I would love to hear what you think of this workshop.

Have a great night and thanks for stopping by!

Friday, October 11, 2019

Perk Up

Are there any Coffee or Latte lovers out there?

Everyone who knows me knows that I love my Coffee and Lattes.
Chai Tea Lattes in particular (hint, hint).

For the past 3 summers I have taken my church youth group on a mission trip 
somewhere in Western Canada.
This year I had a new young lady with me and at the airport I went to get myself
a latte as it was still another flight and then I had to drive us to our destination.  
I mentioned that I needed another coffee. 
 She said, "You really have a thing about coffee don't you?"
YES, YES I do.  
I am a bear without it. LOL 
All my other youth have learned this when I don't have enough coffee. 

So, the Perk Up stamp set is perfect for me and for any coffee lover out there.

Here are some cards and a layout I made using this set and the thin cuts.
The thin cuts are currently being re-ordered and are expected back mid-October. 
If you want the stamp and thin cuts let me know and I will order them 
or let you know as soon as they are back.
 
You can still order just the stamp set right now.

Perk Up and the Hawthorn paper retire at the end of this month.

I created a shaker card using the Perk Up cup thin cut to cut a window in my pattern paper.  I stamped the background under the window in Almond, Espresso, and Toffee inks using the coffee ring stamp.  I just randomly stamped them.  I used my scissors to edge distress the leaf paper and then inked all the edges of all the papers with Espresso ink.  I stamped the sentiment in Sangria ink on a piece of Kraft cardstock that was dovetailed.  The lid was stamped in Pewter ink.  I backed the window with acetate, put 3-D foam tape around the window, added coffee grounds and then stuck the background paper on top.  I then added it to my card base and added the rest of the pieces.

I made this shaker card the same as the other one except I inked the lid using a dauber with Mink ink, to create shadows.  I added hearts in Sangria, and a cup cozy in Almond.  I inked this time with Sangria and Expresso.  Inside the shaker I put coffee grounds, a couple small coffee beans, and a few gold sequins.

I randomly stamped the background again using Espresso, Almond and Toffee ink and the coffee ring image
all over a 12 x 12 piece of White Daisy cardstock. 
I edge distressed the Hawthorn blue leaf paper (4" x 12") with scissors.
 The Kraft photo mats are 4.25" x 6.25".
The journalling strips are 0.5" x 6". 
The title is stamped in Sangria using the Brushed Letters Alphabet.
 The cups and lids are stamped in Pewter.  I used a waterbrush to add shading using Pewter ink. 
The cozies are stamped in Sangria, Saffron, and Almond.
 All the papers were inked with Espresso on the edges.

Gift card holder card.  Here are the inks used.  I stamped the cup and  lid in Pewter, the saying and hearts in the Espresso, the cozy in Saffron.  I created the background with Almond, Toffee and Espresso ink.  I shaded the cup image with ink from the pad using a water brush.  I inked all the paper edges in Espresso ink.  I only put adhesive on the sides and bottom of the Kraft piece.  

What a great Thank you card.  Would work as a great teacher's gift, etc.

Perk Up Stamp Set the images that are highlighted in blue are the ones that have thin cuts for this set.

Supplies Used:


Thanks for stopping by.  
Check out my posts yesterday.  
I explained the new Catalogue cycle in the the last one and how to get FREE copies.